January
26
May
8
External Limiter for 1000w 2000w solar on grid tie inverter 10m cable connected
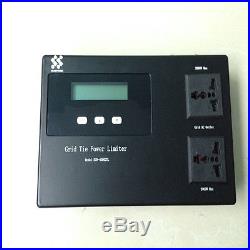
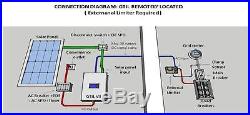
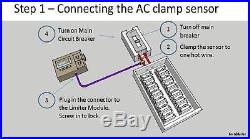
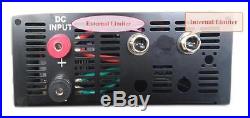
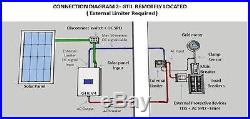
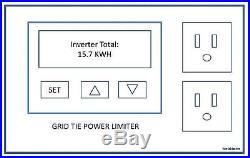
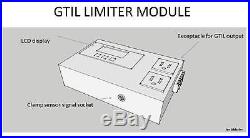
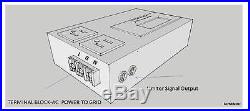
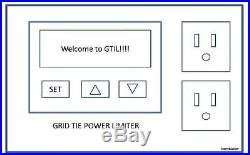
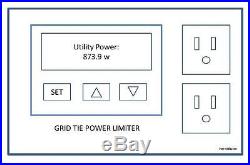

External Limiter for sun solar grid tie inverter (limiter type). -with 10ft/50ft cables/connectors (MAX 30M). The Limiter Module-Parts Description. Displays the Utility Power (grid power), Inverter Power (GTIL power), Utility KWH and Inverter KWH. AC Receptacle For GTIL AC output. Two (2 pcs) – Connects the AC output of GTIL to LM. Can be plug in either receptacle. Maximum Power per receptacle is 2kw or a total of 4kw GTIL can be plugged in the two receptacles. The output of GTIL can also be directly connected to the grid or through the house convenient outlet. But the LCD will not display the Inverter Power. Connects/clamps to one hot wire after the Main Circuit Breaker. Converts the magnetic field created by the flow of current in the wire into small AC voltage and current which is proportional to the power that passes through the wire. Clamp sensor AC signal socket connects the clamp sensor AC signal to the LM module. Terminal Block- AC power to Grid. The AC output of the GTIL is plugged to the LM receptacle in order for the LCD to display the GTIL output in watts and KWH. The GTIL output is connected to the Grid through the Terminal Block. Connecting the terminal block to AC grid also powers the wattmeter and limiter circuit. Limiter DC Signal Output, 2 pcs Connects the LM output signal to the GTIL signal input. User can connect to any of the signal output receptacle. WIRING DIAGRAM WITH EXTERNAL LIMITER. The installations of the GTIL system are shown above, The ac plug can either connect to the nearby AC socket or plug into the limiter socket, the dc signal cable can reach max 30 meters longth so that you can able to install the inverter far away from the limiter module. The ideal installation is that the limiter install near the GTIL. The GTIL unit and the Limiter Module are placed close to each other. The signal wires will be short, as supplied with the unit. Use a dedicated 20 A breaker for the GTIL in the Load Circuit breaker panel board. Wiring and Connection Procedure. After the GTIL and LM are properly installed. Shut off the main circuit breaker. Connect the clamp sensor to one hot wire after the main breaker. Connect the other end of clamp sensor signal cable to the LM. Neatly lay out the signal cable. You can now safely open the Main breaker. 3.2 Connect the LM module to grid. Using the terminal block, use at least wire no. 12 AWG (20A ampacity – wire not included in the package) and connect to 20A circuit breaker dedicated for the GTIL. Make sure the 20A breaker is off while wiring. Do not turn on the breaker! 3.3 Connect the DC signal cable from LM to GTIL input. The connectors have threaded screw to securely fasten the connectors plug at both ends of the cable. Also the connector plugs have dent/slot in the plugs body so it can only be connected in one direction or position. Step 3-Connecting Limiter module DC output signal to. Using the dc signal cable which provided by supplier to connect the external limiter connector of the GTIL to the limiter DC connector. DC output signal socket in the limiter module is marked A and B, you can connect the connector of the cable to either A or B. Plug in and screw in to lock. Step4-Connect the solar panel cable to the GTIL DC input. Connect the Solar panel output to the DC power input of GTIL. The disconnect switch/breaker of solar panel is off. Before connecting the solar panel cable, make sure that the solar panel. Disconnect switch or DC breaker is off and observe correct polarity when. Failure to follow will cause serious problem with the unit. Review all connections and make sure of the tightness of plugs and. Re-check DC polarity connections of solar panel. Turn on the 20A circuit breaker to power the Limiter Module. In the LM, Press SET button below the LCD for a few seconds. Will light up and initialize. After initialization, LCD will display Utility Power, which is the actual power. Or total load in real time. Press the up and down buttons to display the Inverter. Power, Utility power, Utility Total KWH and Inverter Total KWH. Should read zero initially. To reset the Utility Total, just press the up button for a few seconds and you will. Be prompted yes or no to reset. Press up or down button to select either yes or. No, and then press SET to reset. To reset Inverter Total, press the down button continuously and you will. Prompted yes or no also to reset. Press up or down to select yes or no and. Press SET to reset. Connect the GTIL power output to the LM AC receptacle using the. Turn on the disconnect switch/dc breaker of solar panel. The wattmeter in the GTIL should power up and start producing power after a. 3.10 Check the LM display. The utility power should display 0-15w indicating. The GTIL is already supplying power to the load. Check the inverter power display. 3.11 To shutdown, turn-off or unplug first the GTIL before disconnecting the. Power to limiter module. Or shut off the breaker to LM module to cut power to. Do not disconnect Solar panel connection to GTIL while the system. 3.12 In normal operation, when the unit is started or the LM breaker is turned. On, while all the cables are connected and DC breaker is on, there will be about. 2 minutes and 20seconds time delay before the GTIL unit will run. Always remember that for LM module to power-up, need to press Set buttons first in the. LM module for the system to run. GAIA NEW ENERGY is your trusted partner for long term business. We arethe MANUFACUTER of the solar inverter. We are responsible forthe quality of the inverter. The inverter has 2 years guarantee. All return items must be in their original condition. Please do contact with us for return address, details and any other issues. It may not apply to countries with different tariff rules. Please leave us message if you have any question, we will reply in 24 hours, thank you! The item “External Limiter for 1000w 2000w solar on grid tie inverter 10m cable connected” is in sale since Monday, February 06, 2017. This item is in the category “Home & Garden\Home Improvement\Electrical & Solar\Alternative & Solar Energy\Chargers & Inverters”. The seller is “new-power2010″ and is located in ShangHai. This item can be shipped worldwide.
- Brand: SUN
- MPN: EXTERNAL
- Country/Region of Manufacture: China

