March
30
1000GTIL solar grid tie inverter with power limiter prevent extra power to grid
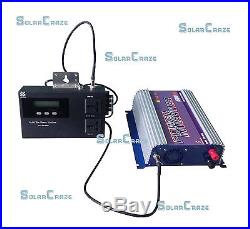
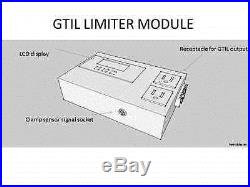
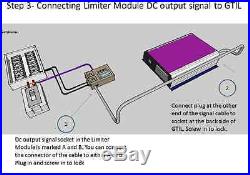
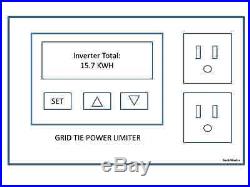
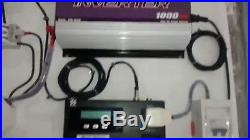
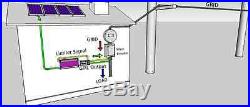

THIS INVERTER INCLUDES LCD. PLEASE INDICATE YOUR COUNTRY VOLTAGE AND THE DC INPUT 22-60V OR 45-90V WHEN PLACING THE ORDER THANK YOU. The grid tie inverters. (GTI) can generate so that the amount of excess power produced by the solar panels are. Reduced to insignificant levels, if not eliminated — because in some countries. The producer pays for the excess power it gives to the distribution grid. Is because the electric power meters the one provided by the electricity provider in the. Area are not aware of the direction of power flow. In other words it only adds even if. Power is exported to the grid, thus, the consumers will be charged for power even if it is. Given to the grid, and this is the problem. On-Grid System Using Standard Grid Tie Inverter. The Grid Tie inverter converts DC power produced by Solar Panels to AC, connects to the grid and feed all of the power available from the panels. To the AC load. All excess power that is not needed by the load is then exported to the Grid. If the Grid fails, then the Grid Tie Inverter will turn off. When the Grid comes back on line. The Grid Tie Inverter will again supply power to the load and any excess power is exported to the Grid again. If the Solar Panel is producing less power and the GTI cannot deliver all the power needed by the load, then power. Will be supplemented by the Grid. Power Meters (Except smart meter) are not aware of the direction of Power flow. The user then pays for the power exported and delivered by the Grid. On-Grid System Using Grid Tie Inverter With Limiter (GTIL). The Grid Tie Inverter with Limiter delivers only the power needed by the load and prevents delivering excess power hence avoids excess power in going back to the Grid. The heart of the Grid Tie Inverter with Limiter is the Limiter Module (LM). The LM continuously sampled the power needed by the load through the current sensor connected after the Main Circuit Breaker. The LM then will process the signal. It then sends signal to Grid Tie Inverter how much power to deliver to the load in real time. The user, after installing and connecting the GTIL correctly, need not do anything and the unit will do its work automatically. The Limiter Module-Parts Description. Displays the Utility Power (grid power), Inverter Power (GTIL power), Utility KWH and Inverter KWH. AC Receptacle For GTIL AC output. Two (2 pcs) – Connects the AC output of GTIL to LM. Can be plug in either receptacle. Maximum Power per receptacle is 2kw or a total of 4kw GTIL can be plugged in the two receptacles. The output of GTIL can also be directly connected to the grid or through the house convenient outlet. But the LCD will not display the Inverter Power. Connects/clamps to one hot wire after the Main Circuit Breaker. Converts the magnetic field created by the flow of current in the wire into small AC voltage and current which is proportional to the power that passes through the wire. Clamp sensor AC signal socket connects the clamp sensor AC signal to the LM module. Terminal Block- AC power to Grid. The AC output of the GTIL is plugged to the LM receptacle in order for the LCD to display the GTIL output in watts and KWH. The GTIL output is connected to the Grid through the Terminal Block. Connecting the terminal block to AC grid also powers the wattmeter and limiter circuit. Limiter DC Signal Output, 2 pcs Connects the LM output signal to the GTIL signal input. User can connect to any of the signal output receptacle. This is the ideal installation. The GTIL unit and the Limiter Module are placed close to each other. The signal wires will be short, as supplied with the unit. Use a dedicated 20 A breaker for the GTIL in the Load Circuit breaker panel board. Wiring and Connection Procedure. After the GTIL and LM are properly installed. Shut off the main circuit breaker. Connect the clamp sensor to one hot wire after the main breaker. Connect the other end of clamp sensor signal cable to the LM. Neatly lay out the signal cable. You can now safely open the Main breaker. Connect the LM module to grid. Using the terminal block, use atleast wire no. 12 AWG (20A ampacity – wire not included in the package) and connect to 20A circuit breaker dedicated for the GTIL. Make sure the 20A breaker is off while wiring. Do not turn on the breaker! Connect the DC signal cable from LM to GTIL input. The connectors have threaded screw to securely fasten the connectors plug at both ends of the cable. Also the connector plugs have dent/slot in the plugs body so it can only be connected in one direction or position. Connect the Solar panel output to the DC power input of GTIL. Make sure the disconnect switch/breaker of solar panel is off. Review all connections and make sure of the tightness of plugs and connections. Re-check DC polarity connections of solar panel. Turn on the 20A circuit breaker to power the Limiter Module. In the LM, Press SET button below the LCD for a few seconds. The LCD will light up and initialize. After initialization, LCD will display Utility Power, which is the actual power or total load in real time. Press the up and down buttons to display the Inverter Power, Utility power, Utility Total KWH and Inverter Total KWH. Inverter Power should read zero initially. To reset the Utility Total, just press the up button for a few seconds and you will be prompted yes or no to reset. Press up or down button to select either yes or no, and then press SET to reset. To reset Inverter Total, press the down button continuously and you will prompted yes or no also to reset. Press up or down to select yes or no and Press SET to reset. Connect the GTIL power output to the LM AC receptacle using the supplied cable. Turn on the disconnect switch/dc breaker of solar panel. The wattmeter in the GTIL should power up and start producing power after a minute or two. Check the LM display. The utility power should display 0-15w indicating the GTIL is already supplying power to the load. Check the inverter power display in the LCD. To shutdown, turn-off or unplug first the GTIL before disconnecting the power to limiter module. Or shut off the breaker to LM module to cut power to whole set-up. Do not disconnect Solar panel connection to GTIL while the system is operating. In normal operation, when the unit is started or the LM breaker is turned on, while all the cables are connected and DC breaker is on, there will be about 2 minutes and 20seconds time delay before the GTIL unit will run. Always remember that for LM module to power-up, need to press Set buttons first in the LM module for the system to run. Remote Installation of GTIL and LM. Users may require that GTIL will need to be remotely installed or away from the Circuit Breakers Panel Board. In so doing, the Signal cable will need to be made much longer. The maximum cable length that can be used is 30m. The item “1000GTIL solar grid tie inverter with power limiter prevent extra power to grid” is in sale since Thursday, January 28, 2016. This item is in the category “Home & Garden\Home Improvement\Electrical & Solar\Alternative & Solar Energy\Chargers & Inverters”. The seller is “jadoni1982″ and is located in Ningbo, Zhejiang. This item can be shipped worldwide.
- Brand: Mass Power
- Model: 1000GTIL 22-60V
- MPN: 8504403090
- Country/Region of Manufacture: China
